Page 226 - needle bearings
P. 226
Roller followers: Yoke-type track rollers
                                                                                                              NTN


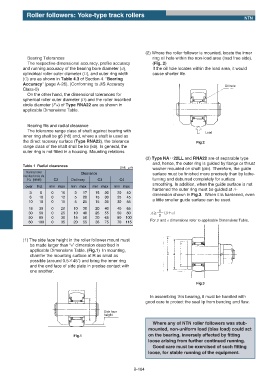
                                                                  (2) Where the roller follower is mounted, locate the inner
             Bearing Tolerances                                      ring oil hole within the non-load area (load free side).
             The respective dimensional accuracy, profile accuracy   (Fig. 2)
           and running accuracy of the bearing bore diameter (d),    If the oil hole locates within the load area, it would
           cylindrical roller outer diameter (D), and outer ring width  cause shorter life.
           (C) are as shown in Table 4.3 of Section 4. "Bearing
           Accuracy" (page A-26). (Conforming to JIS Accuracy
                                                                                                     Oil hole
           Class-0)
             On the other hand, the dimensional tolerances for
           spherical roller outer diameter (D) and the roller inscribed
           circle diameter (FW) of Type RNA22 are as shown in
           applicable Dimensions Table.


             Bearing fits and radial clearance
             The tolerance range class of shaft against bearing with                        Load
           inner ring shall be g6 (h6) and, where a shaft is used as
           the direct raceway surface (Type RNA22), the tolerance                       Fig.2
           range class of the shaft shall be k5 (k6). In general, the
           outer ring is not fitted in a housing. Mounting relations
                                                                  (3) Type NAŋŋŋŋ22LL and RNA22 are of separable type
                                                                     and, hence, the outer ring is guided by flange or thrust
           Table 1  Radial clearances
                                                      Unit: Жm       washer mounted on shaft (pin). Therefore, the guide
             Nominal roller          Clearance
           inscribed circle dia.                                     surface must be finished more precisely than by lathe-
             Fw  (mm)    C2      Ordinary   C3        C4             turning and deburred completely for surface
                                                                     smoothing. In addition, when the guide surface is not
            over  Incl.  min max  min max  min max  min max
                                                                     hardened the outer ring must be guided at A-
              3    6    0   10    3   17   15   30   20  40          dimension shown in Fig.3.  When it is hardened, even
              6   10    0   12    5   20   15   30   25  45
              10  18    0   15    5   25   15   35   30  55          a little smaller guide surface can be used.
              18  30    0   20    10  30   20   40   40  65
                                                                        1
              30  50    0   25    10  40   25   55   50  80         AʾʕʕʢDʴeʣ
                                                                        2
              50  80    0   30    15  50   30   65   60  100
              80  100   0   35    20  55   35   75   70  115        For D and e dimensions refer to applicable Dimensions Table.


           (1) The side face height in the roller follower mount must
              be made larger than “e” dimension described in
              applicable Dimensions Table. (Fig.1)  In mounting,
              chamfer the mounting surface at R as small as
              possible (around 0.5ʷ45˚) and bring the inner ring
              and the end face of side plate in precise contact with
              one another.


                                                                                        Fig.3


                                                                    In assembling this bearing, it must be handled with
                                                                  good care to protect the seal lip from bending and flaw.

                                               Side face
                                               height
                                                                     Where any of NTN roller followers was stub-
                                                                   mounted, non-uniform load (bias load) could act
                                  Fig.1                            on the bearing, inversely affected by fitting
                                                                   loose arising from further continued running.
                                                                     Good care must be exercised of such fitting
                                                                   loose, for stable running of the equipment.


                                                            B-164

