Page 42 - needle bearings
P. 42

Shaft and Housing Design
             Bearing Fits
                                                                                                              NTN
                                                                                                             NTN


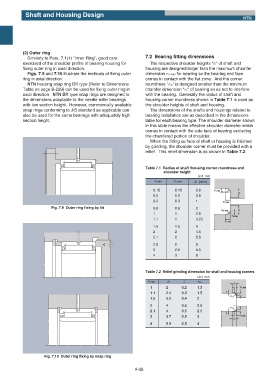
           (2) Outer ring
             Similarly to Para. 7.1(1) "Inner Ring", good care    7.2  Bearing fitting dimensions
           exercised of the shoulder profile of bearing housing for  The respective shoulder heights "h" of shaft and
           fixing outer ring in axial direction.                  housing are designed larger than the maximum chamfer
             Figs. 7.9 and 7.10 illustrate the methods of fixing outer  dimension rs max for bearing so the bearing end face
           ring in axial direction.                               comes in contact with the flat zone.  And the corner
             NTN housing snap ring BR type (Refer to Dimensions   roundness "ras" is designed smaller than the minimum
           Table on page B-229) can be used for fixing outer ring in  chamfer dimension "rs" of bearing so as not to interfere
           axial direction.  NTN BR type snap rings are designed to  with the bearing.  Generally the radius of shaft and
           the dimensions adaptable to the needle roller bearings  housing corner roundness shown in Table 7.1 is used as
           with low section height.  However, commercially available  the shoulder heights of shaft and housing.
           snap rings conforming to JIS standard as applicable can  The dimensions of the shafts and housings related to
           also be used for the same bearings with adequately high  bearing installation are as described in the dimensions
           section height.                                        table for each bearing type. The shoulder diameter shown
                                                                  in this table means the effective shoulder diameter which
                                                                  comes in contact with the side face of bearing excluding
                                                                  the chamfered portion of shoulder.
                                                                    When the fitting surface of shaft or housing is finished
                                                                  by grinding, the shoulder corner must be provided with a
                                                                  relief.  This relief dimension is as shown in Table 7.2.


                                                                  Table 7.1  Radius of shaft /housing corner roundness and
                                                                          shoulder height
                                                                                         Unit  mm
                                                                      rs min  ras max  h  (min)
                                                                     0.15      0.15     0.6     rs min
                                                                                                   ras max  h
                                                                     0.2       0.2      0.8
                                                                     0.3       0.3      1
                                                                                                    rs min
                        Fig. 7.9  Outer ring fixing by lid           0.6       0.6      2
                                                                                                   ras max  h
                                                                     1         1        2.5
                                                                                                        rs min
                                                                     1.1       1        3.25
                                                                                                     rs min
                                                                     1.5       1.5      4
                                                                     2         2        4.5
                                                                     2.1       2        5.5
                                                                     2.5       2        6
                                                                     3         2.5      6.5
                                                                     4         3        8


                                                                  Table 7.2  Relief grinding dimension for shaft and housing corners
                                                                                         Unit  mm
                                                                   rs min  b       t     rcs
                                                                                                         b
                                                                    1      2      0.2    1.3               rs min
                                                                    1.1    2.4    0.3    1.5         t
                                                                                                       rcs
                                                                    1.5    3.2    0.4    2
                                                                    2      4      0.5    2.5
                                                                                                       rcs
                                                                    2.1    4      0.5    2.5
                                                                                                     t
                                                                    3      3.7    0.5    3                 rs min
                                                                                                         b
                                                                    4      5.9    0.5    4


                     Fig. 7.10  Outer ring fixing by snap ring


                                                             A-38
   37   38   39   40   41   42   43   44   45   46   47