Page 96 - needle bearings
P. 96
Drawn cup needle roller bearings
                                                                                                              NTN


                                                                  thickness) and thereafter the inscribed circle
           Bearing Tolerances and Measuring Methods               diameter (Fw) is measured using a plug gauge or a
             The outer ring of drawn cup needle roller bearing is so  taper gauge to evaluate the bearing accuracy.
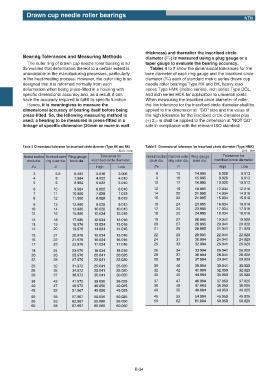
           thin-walled that deformation thereof to a certain extent is  Tables 4 to 7 show the dimensional tolerances for the
           unavoidable in the manufacturing processes, particularly  bore diameter of each ring gauge and the inscribed circle
           in the heat-treating process. However, the outer ring is so  diameter (Fw) each of standard metric series drawn cup
           designed that it is reformed normally from such        needle roller bearings Type HK and BK, heavy load
           deformation when being press-fitted in a housing with  series Type HMK (metric series), inch series Type DCL,
           specific dimensional accuracy and, as a result, it can  and inch series HCK for application to universal joints.
           have the accuracy required to fulfill its specific function.   When measuring the inscribed circle diameter of roller,
             Hence, it is meaningless to measure the              the low tolerance for the inscribed circle diameter shall be
           dimensional accuracy of bearing itself before being    applied to the dimension at  "GO" side and the value of
           press-fitted. So, the following measuring method is    the high tolerance for the inscribed circle diameter plus
           used; a bearing to be measured is press-fitted in a    (+) 2Жm shall be applied to the dimension at "NOT GO"
           linkage of specific dimension (20mm or more in wall    side in compliance with the relevant ISO standard.


           Table 4  Dimensional tolerance for inscribed circle diameter (Type HK and BK)  Table 5  Dimensional tolerance for inscribed circle diameter (Type HMK)
                                                      Unit : mm                                             Unit : mm
            Nominal inscribed Nominal outer Ring gauge  Tolerance for  Nominal inscribed Nominal outer Ring gauge  Tolerance for
             circle dia.  ring outer dia.  bore dia.  inscribed circle diameter  circle dia.  ring outer dia.  bore dia.  inscribed circle diameter
               Fw        D                  High      Low             Fw        D                 High      Low
                3          6.5    6.484     3.016     3.006           8        15       14.995    8.028     8.013
                4          8      7.984     4.022     4.010           9        16       15.995    9.028     9.013
                5          9      8.984     5.022     5.010          10        17       16.995   10.028    10.013
                6        10       9.984     6.022     6.010          12        19       18.995   12.034    12.016
                7        11      10.980     7.028     7.013          14        22       21.995   14.034    14.016
                8        12      11.980     8.028     8.013          15        22       21.995   15.034    15.016
                9        13      12.980     9.028     9.013          16        24       23.995   16.034    16.016
               10        14      13.980    10.028    10.013          17        24       23.995   17.034    17.016
               12        16      15.980    12.034    12.016          18        25       24.995   18.034    18.016
               12        18      17.980    12.034    12.016          19        27       26.995   19.041    19.020
               13        19      18.976    13.034    13.016          20        27       26.995   20.041    20.020
               14        20      19.976    14.034    14.016          21        29       28.995   21.041    21.020
               15        21      20.976    15.034    15.016          22        29       28.995   22.041    22.020
               16        22      21.976    16.034    16.016          24        31       30.994   24.041    24.020
               17        23      22.976    17.034    17.016          25        33       32.994   25.041    25.020
               18        24      23.976    18.034    18.016          26        34       33.994   26.041    26.020
               20        26      25.976    20.041    20.020          28        37       36.994   28.041    28.020
               22        28      27.976    22.041    22.020          29        38       37.994   29.041    29.020
               25        32      31.972    25.041    25.020          30        40       39.994   30.041    30.020
               28        35      34.972    28.041    28.020          32        42       41.994   32.050    32.025
               30        37      36.972    30.041    30.020          35        45       44.994   35.050    35.025
               35        42      41.972    35.050    35.025          37        47       46.994   37.050    37.025
               40        47      46.972    40.050    40.025          38        48       47.994   38.050    38.025
               45        52      51.967    45.050    45.025          40        50       49.994   40.050    40.025
               50        58      57.967    50.050    50.025          45        55       54.994   45.050    45.025
               55        63      62.967    55.060    55.030          50        62       61.994   50.050    50.025
               60        68      67.967    60.060    60.030


                                                             B-34

