Page 196 - domce
P. 196
9      INTERNAL SELF-ALIGNING BALL & ROLLER BEARING UNITS


                5. Handling bearings


                Procedure for Mounting Spherical Roller Bearings with Tapered Bore and using an Adapter Sleeve

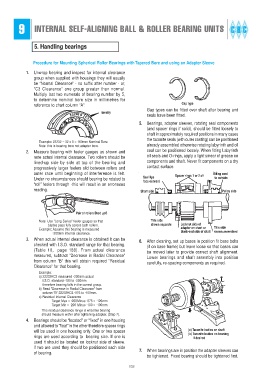
             1. Unwrap bearing and inspect for internal clearance
                group when supplied with housings they will usually
                be “Normal Clearance” - no suffix after number - or,
                “C3 Clearance” one group greater than normal.                                or
                Multiply last two numerals of bearing number by 5,
                to determine nominal bore size in millimetres for
                reference to chart column “A”.                                    Gap type
                                                                  Gap types can be fitted over shaft after bearing and
                                              Identify
                                                                  seals have been fitted.
                                                               5. Bearings, adapter sleeves, rotating seal components
                                                                  (and spacer rings if solid), should be fitted loosely to
                                                                  shaft in approximately required positions in many cases
                                                                  the taconite seals (with outer casting) can be positioned
                  Example: 22232 – 32 x 5 = 160mm Nominal Bore
                  Note: this is bearing bore not adapter bore.    already assembled otherwise rotating labyrinth and oil
             2. Measure bearing with feeler gauges as shown and   seal can be positioned loosely. When fitting Labyrinth
                note actual internal clearance. Two rollers should be  oil seals and O-rings, apply a light smear of grease on
                lined-up side by side at top of the bearing and   components and shaft. Never fit components on a dry
                progressively larger feelers slid between rollers and  contact surface.
                outer race until beginning of interference is felt.            Spacer rings 1 or 2 off  ÒOÓ ring cord
                Under no circumstances should bearing be rotated to  Seal lips                    to outside
                                                                 face outward
                “roll” feelers through -this will result in an erroneous
                reading.                                       Short side                           Pulley side


                                   Pair of rollers Òlined upÓ
                  Note: Use “Long Series” feeler gauges so that     This side
                            blades pass fully across both rollers.  shown separate  Locknut side of
                  Example: Assume this bearing is measured                       adapter on short or  This side
                        .                                                        blank-end side of shaft  shown assembled
                          200mm internal clearance.
             3. When actual internal clearance is obtained it can be
                                                               6. After cleaning, set up bases in position fit base bolts
                checked with I.S.O. standard range for that bearing.
                                                                  (if on base frame) but leave loose so that bases can
                (Table 10,  page 188). From actual clearance
                                                                  be moved later to provide correct shaft alignment.
                measured, subtract “Decrease in Radial Clearance”
                                                                  Lower bearings and shaft assembly into position
                from column “B” this will obtain required “Residual
                                                                  carefully, re-spacing components as required.
                Clearance” for that bearing.
                  Example:
                                 .
                  a) 22232KC3 measured  200mm actual
                              .
                                  .
                      I.S.O. standard  180 to  230mm
                      therefore bearing falls in the correct group.
                  b) Read “Decrease in Radial Clearance” from
                                       .
                                  .
                      column “B” 22232KC3  075 to  100mm.
                  c) Residual Internal Clearance
                                            .
                                .
                                       .
                        Target Max =  200Minus  075 =  125mm
                                .
                                            .
                                       .
                        Target Min =  200 Minus  100 =  100mm
                     This residual clearance range is what the bearing
                     should measure within after tightening adapter, (Step 7).
             4. Bearings should be “located” or “fixed” in one housing
                and allowed to “float” in the other therefore spacer rings
                will be used in one housing only. One or two spacer                  (a) Taconite bodies on shaft
                                                                                     (b) Taconite bodies on housing
                rings are used according to  bearing size. If one is                       if desired
                used it should be located on locknut side of sleeve.
                If two are used they should be positioned each side
                of bearing.                                    7. When bearings are in position the adapter sleeves can
                                                                  be tightened. Fixed bearing should be tightened first,
                                                          192

