Page 341 - needle bearings
P. 341
Appendix
                                                                                                         NTN


      Ordinary tolerance for straightness        Unit : mm   Ordinary tolerance for straightness        Unit : mm
            Classification by plate thickness                      Classification by plate thickness
                           1.6 and less Over 1.6  3 incl. Over 3  6 incl.         3 and less  Over 3  6 incl. Over 6  12 incl.
                  Tolerance class                                       Tolerance class
       Cutting width division  Class-A Class-B Class-A Class-B Class-A Class-B  Cutting width division  Class-A Class-B Class-A Class-B Class-A Class-B
        120 and less        0.2  0.3  0.2  0.3  0.5  0.8       120 and less       0.3  0.5  0.5  1.0  ʵ   1.6
        Over 120 - 315 incl.  0.3  0.5  0.3  0.6  1.0  1.6     Over 120 - 315 incl.  0.6  1.2  0.8  1.6  ʵ  2.0
        Over 315 - 1000 incl.  0.4  0.9  0.5  1.0  1.4  2.0    Over 315 - 1000 incl.  1.6  3.0  2.0  3.0  ʵ  3.0
        Over 1000 - 2000 incl.  0.6  1.2  0.8  1.6  2.5  3.0   Over 1000 - 2000 incl.  3.0  6.0  4.0  6.0  ʵ  6.0
        Over 2000 - 3150 incl.  0.9  1.6  1.0  2.2  2.8  4.5   Over 2000 - 3150 incl.  4.5  9.0  5.5  9.0  ʵ  9.0
      Remarks: Non-applicable to cutting width of less than 20 times as much as
                       plate thickness or cutting width of less than 30mm.


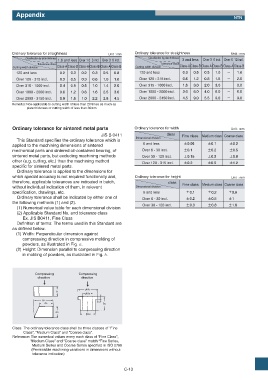
       Ordinary tolerance for sintered metal parts           Ordinary tolerance for width               Unit : mm
                                              JIS B 0411                   class  Fine class  Medium class Coarse class
                                                             Dimensional division
         This Standard specifies the ordinary tolerance which is
                                                                 6 and less        ʶ0.05     ʶ0.1      ʶ0.2
       applied to the machining dimensions of sintered
       mechanical parts and sintered oil-contained bearing, of  Over 6 - 30 incl.  ʶ0.1      ʶ0.2      ʶ0.5
       sintered metal parts, but excluding machining methods    Over 30 - 120 incl.  ʶ0.15   ʶ0.3      ʶ0.8
       other (e.g. cutting, etc.) than the machining method
                                                                Over 120 - 315 incl.  ʶ0.2   ʶ0.5      ʶ1.2
       specific for sintered metal parts.
         Ordinary tolerance is applied to the dimensions for
       which special accuracy is not required functionally and,  Ordinary tolerance for height          Unit : mm
       therefore, applicable tolerances are indicated in batch,             class  Fine class  Medium class Coarse class
       without individual indication of them, in relevant    Dimensional division
       specification, drawings, etc.                             6 and less         ʶ0.1     ʶ0.2     ʶ0.6
         Ordinary tolerance shall be indicated by either one of  Over 6 - 30 incl.  ʶ0.2     ʶ0.5     ʶ1
       the following methods (1) and (2).
                                                                Over 30 - 120 incl.  ʶ0.3    ʶ0.8     ʶ1.8
         (1) Numerical value table for each dimensional division
         (2) Applicable Standard No. and tolerance class
           Ex. JIS B0411, Fine Class
         Definition of terms: The terms used in this Standard are
       as defined below.
        (1) Width: Perpendicular dimension against
           compressing direction in compressive molding of
           powders, as illustrated in Fig. a.
        (2) Height: Dimension parallel to compressing direction
           in molding of powders, as illustrated in Fig. b.


                 Compressing        Compressing
                  direction          direction


                                       Пa1
                          b
                                       Пa2
                    a1
                                            b1
                     a2                        b2
                          a3
                                       Пa3

       Class: The ordinary tolerance class shall be three classes of “Fine
           Class”, “Medium Class” and “Coarse class”.
       Reference: The numerical values every each class of “Fine Class”,
               “Medium Class” and “Coarse class” match “Fine Series,
               Medium Series and Coarse Series specified in ISO 2768
               (Permissible machining variations in dimensions without
               tolerance indication)


                                                        C-13

