Page 59 - needle bearings
P. 59
Technical Data
                                                                                                         NTN


         expressed in the following formula                  For hardness HRC50 at NATR15X,
                                                                   Tcʹ11 900N (1 220kgf)ɼ  Gʹ1.987
          Li ʹmLi ʶ3МLi  ʜʜʜʜʜʜʜʜʜʜʜʜʜʜ(11.8)
                                                                ˀ Tc ʹ1.987ʷ11 900N (1 220kgf)
       [5] Radial internal clearance can be determined               ʹ23 645N (2 424kgf)
         considering the mean value and standard deviation of
         shaft in formulas (11.6), (11.7).                   Reference (Track load capacity calculation process)

                                                               ¡For a cylindrical outer ring
       [6] The aiming radial internal clearance value is generally
         set up so an ordinary clearance can be got. However,             1    TcЄЛ
                                                                ɹМmaxʹ
         the recommended clearance values are available                 60.9    Beff
         every the individual portions in the case of bearing
                                                               ¡For spherical R outer
         application to automobile. Feel free to contact NTN for             3
         the detail.                                            ɹМmaxʹ   187       2
                                                                        ЖЗ   ʢЄЛʣTc
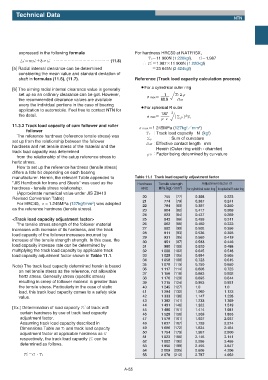
       11.3.2 Track load capacity of cam follower and roller
                                                                                         2
                                                              МNBYʹ1 245MPa (127kgfʗmm )
             follower                                             Tc ɿTrack load capacity   N  (kgf)
         The reference hardness (reference tensile stress) was
                                                                  ЄЛ       ɿSum of curvature
       set up from the relationship between the follower          BeffɿEffective contact length   mm
       hardness and net tensile stress of the material and the
                                                                      Herein (Outer ring width - chamfer)
       track load capacity was determined                         ЖЗɿFactor being determined by curvature
         from the relationship of the setup reference stress to
       hertz stress.
         How to set up the reference hardness (tensile stress)
       differs a little bit depending on each bearing
       manufacturer. Herein, the relevant Table appended to  Table 11.1  Track load capacity adjustment factor
       "JIS Handbook for Irons and Steels" was used as the    Hardness   Tensile strength     Adjustment factor G
       hardness - tensile stress relationship.                  HRC    MPaʨkgfʗmm ʩ for cylindrical outer ring for spherical R outer ring
                                                                                 2

         (Approximate numerical value under JIS Z8413
       Revised Conversion Table)                                20        755  ʨ77ʩ     0.368        0.223
                                                                                        0.387
                                                                          774
                                                                              ʨ79ʩ
                                                                21
                                                                                                     0.241
                                          2
         For HRC40, М= 1.245MPa (127kgf/mm ) was adopted        22        784  ʨ80ʩ     0.397        0.250
       as the reference hardness (tensile stress).              23        804  ʨ82ʩ     0.417        0.269
                                                                24        823  ʨ84ʩ     0.437        0.289
       <Track load capacity adjustment factor>                  25        843  ʨ86ʩ     0.459        0.311
         The tensile stress strength of the follower material   26        862  ʨ88ʩ     0.480        0.333
       increases with increase of its hardness, and the track   27        882  ʨ90ʩ     0.502        0.356
                                                                28        911  ʨ93ʩ     0.536        0.393
       load capacity of the follower increases incurred by      29        931  ʨ95ʩ     0.560        0.419
       increase of the tensile strength strength. In this case, the
                                                                30        951  ʨ97ʩ     0.583        0.446
       load capacity increase rate can be determined by         31        980  ʨ100ʩ    0.620        0.488
       multiplying the track load capacity by applicable track  32       1 000  ʨ102ʩ   0.645        0.518
       load capacity adjustment factor shown in Table 11.1.     33       1 029  ʨ105ʩ   0.684        0.565
                                                                34       1 058  ʨ108ʩ   0.723        0.615
       Note) The track load capacity determined herein is based  35      1 078  ʨ110ʩ   0.750        0.650
         on net tensile stress as the reference, not allowable  36       1 117  ʨ114ʩ   0.806        0.723
                                                                37       1 156  ʨ118ʩ   0.863        0.802
         hertz stress. Generally stress (specific stress)       38       1 176  ʨ120ʩ   0.893        0.844
         resulting in creep of follower material is greater than  39     1 215  ʨ124ʩ   0.953        0.931
         the tensile stress. Particularly in the case of static  40      1 245  ʨ127ʩ   1.0          1.0
         load, this track load capacity comes to a safety side  41       1 294  ʨ132ʩ   1.080        1.123
         value.                                                 42       1 333  ʨ136ʩ   1.147        1.228
                                                                43       1 382  ʨ141ʩ   1.233        1.369
                                                                44       1 431  ʨ146ʩ   1.322        1.519
       [Ex.] Determination of load capacity Tc  of track with   45       1 480  ʨ151ʩ   1.414        1.681
          certain hardness by use of track load capacity        46       1 529  ʨ156ʩ   1.509        1.853
          adjustment factor.                                    47       1 578  ʨ161ʩ   1.607        2.037
          Assuming track load capacity described in             48       1 637  ʨ167ʩ   1.729        2.274
          Dimensions Table as Tc and track load capacity        49       1 686  ʨ172ʩ   1.834        2.484
          adjustment factor at applicable hardness as G         50       1 754  ʨ179ʩ   1.987        2.800
                                                                51       1 823  ʨ186ʩ   2.145        3.141
          respectively, the track load capacity Tc  can be      52       1 882  ʨ192ʩ   2.286        3.455
          determined as follows.
                                                                53       1 950  ʨ199ʩ   2.455        3.847
                                                                54       2 009  ʨ205ʩ   2.606        4.206
            Tc ʹGɾTc                                            55       2 078  ʨ212ʩ   2.787        4.652


                                                        A-55

